> ## Documentation Index
> Fetch the complete documentation index at: https://help.getvero.com/llms.txt
> Use this file to discover all available pages before exploring further.
# Send or schedule a broadcast
> Send a broadcast immediately or schedule it for a specific date and time.
Once you've configured your broadcast's audience and content, you can choose when to send it. Vero offers two primary options: send immediately or schedule for a specific date and time.
## Send immediately
Select **Immediate** as your trigger to send your broadcast as soon as you click **Start Campaign**. This option makes sense for:
* Urgent announcements
* Time-sensitive promotions
* Quick one-off messages
When you start an immediate campaign, Vero begins processing your audience and sending messages right away.
## Schedule for later
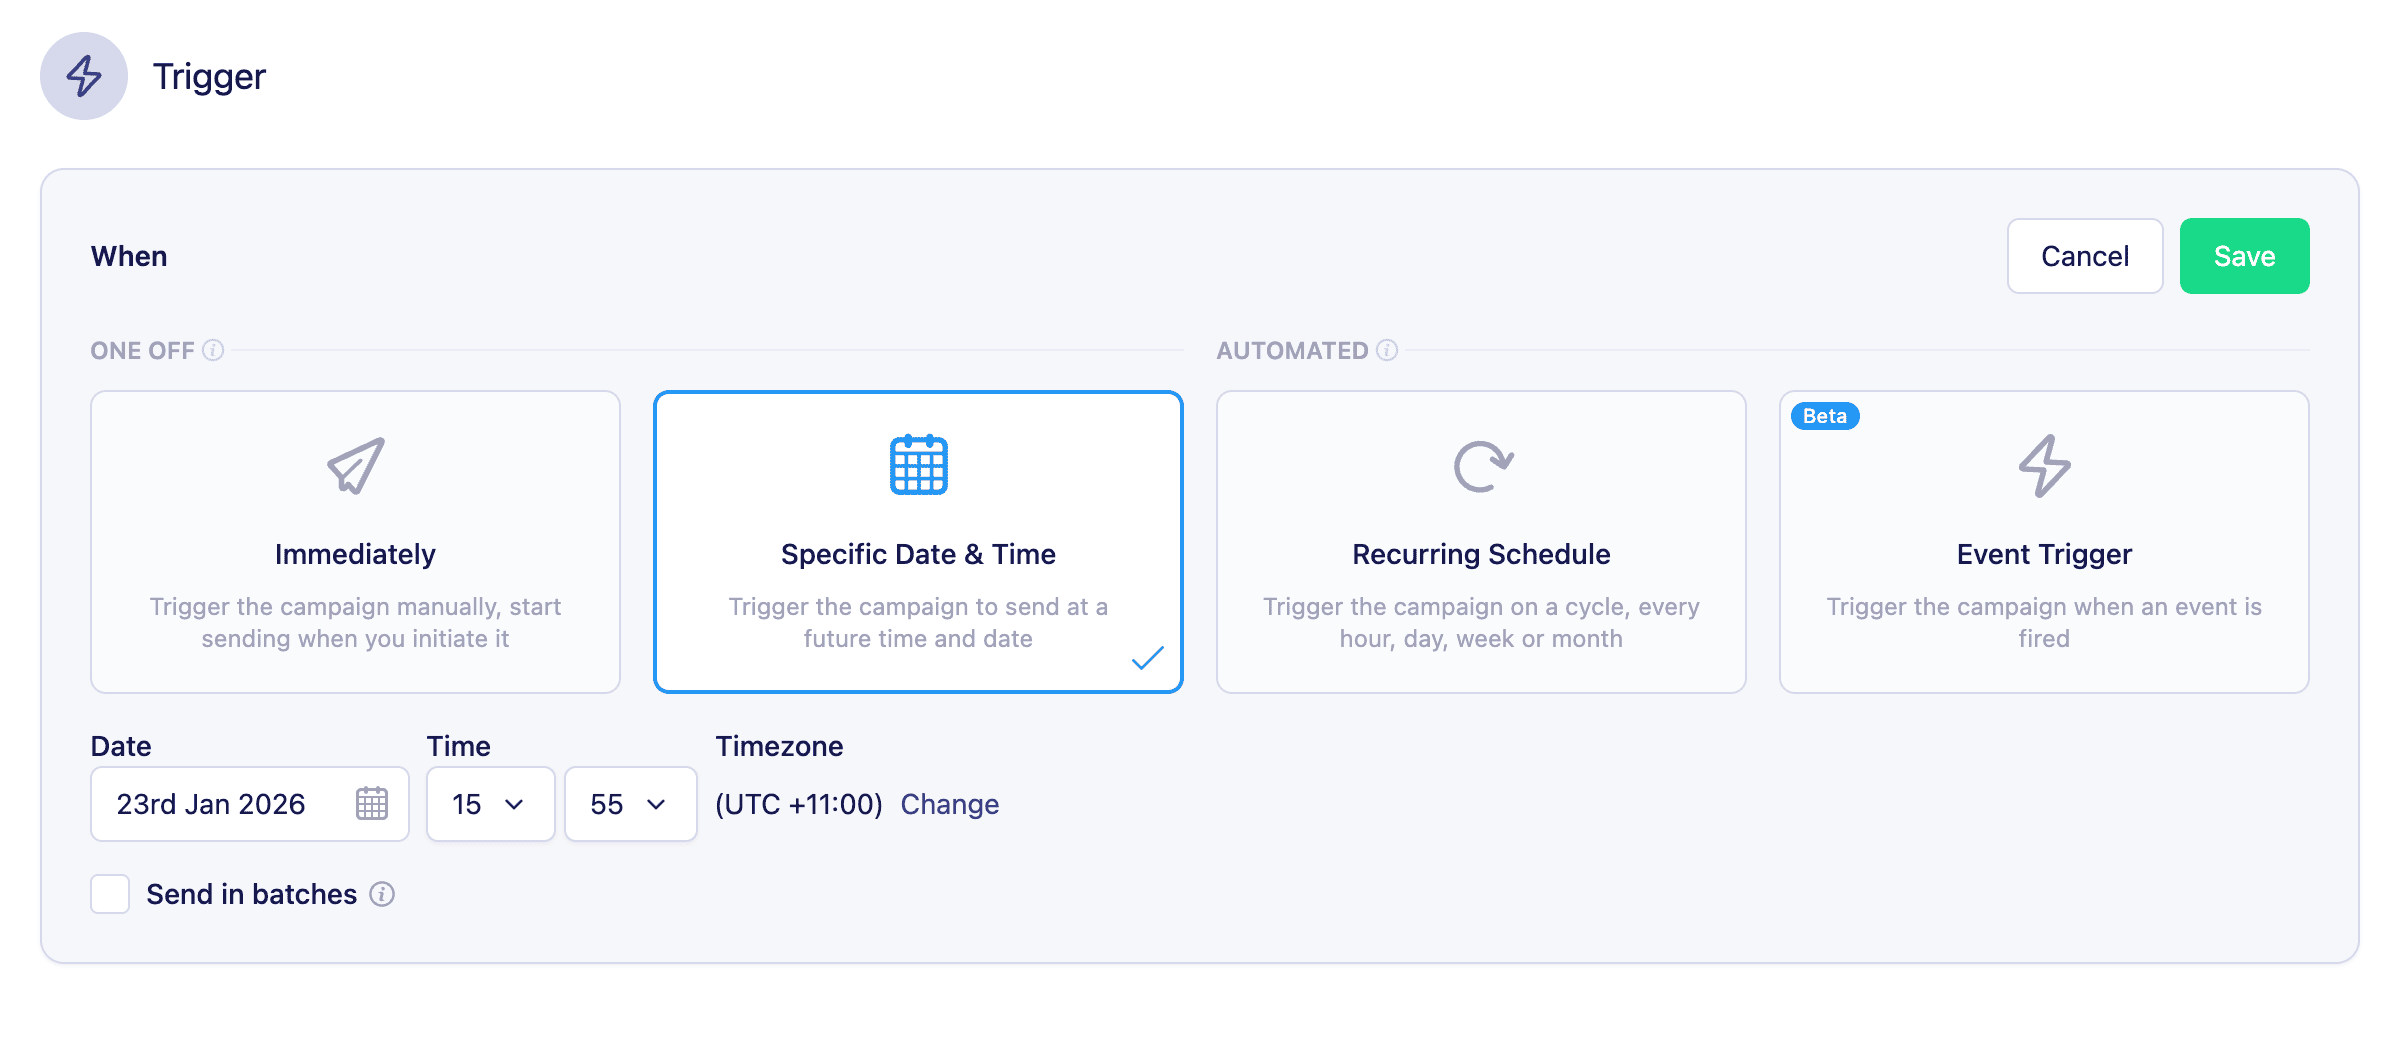 Select **Specific Date & Time** as your trigger to send your broadcast at a specific date and time. This option is great for:
* Product launches
* Event invitations
* Timed announcements aligned with other marketing activities
To schedule a broadcast:
1. Select **Specific Date & Time** as your trigger type
2. Choose the date and time you want the campaign to send
3. Specify the timezone that your date and time are in
4. Click **Save**. When you [launch the campaign](#review-and-launch), Vero will send messages at the scheduled time.
Scheduled campaigns use your project's timezone setting by default if you don't specify a timezone. Make sure your project timezone is configured correctly in your project settings.
### Timezone handling
When scheduling broadcasts, Vero uses your project's timezone setting to determine when to send. If your audience spans multiple timezones, messages will be sent at the scheduled time in your project's timezone, not the recipient's local time.
For example, if your project is set to US Eastern Time and you schedule a broadcast for 9:00 AM, all recipients will receive the message at 9:00 AM Eastern, regardless of their local timezone.
## Batch sending
Select **Specific Date & Time** as your trigger to send your broadcast at a specific date and time. This option is great for:
* Product launches
* Event invitations
* Timed announcements aligned with other marketing activities
To schedule a broadcast:
1. Select **Specific Date & Time** as your trigger type
2. Choose the date and time you want the campaign to send
3. Specify the timezone that your date and time are in
4. Click **Save**. When you [launch the campaign](#review-and-launch), Vero will send messages at the scheduled time.
Scheduled campaigns use your project's timezone setting by default if you don't specify a timezone. Make sure your project timezone is configured correctly in your project settings.
### Timezone handling
When scheduling broadcasts, Vero uses your project's timezone setting to determine when to send. If your audience spans multiple timezones, messages will be sent at the scheduled time in your project's timezone, not the recipient's local time.
For example, if your project is set to US Eastern Time and you schedule a broadcast for 9:00 AM, all recipients will receive the message at 9:00 AM Eastern, regardless of their local timezone.
## Batch sending
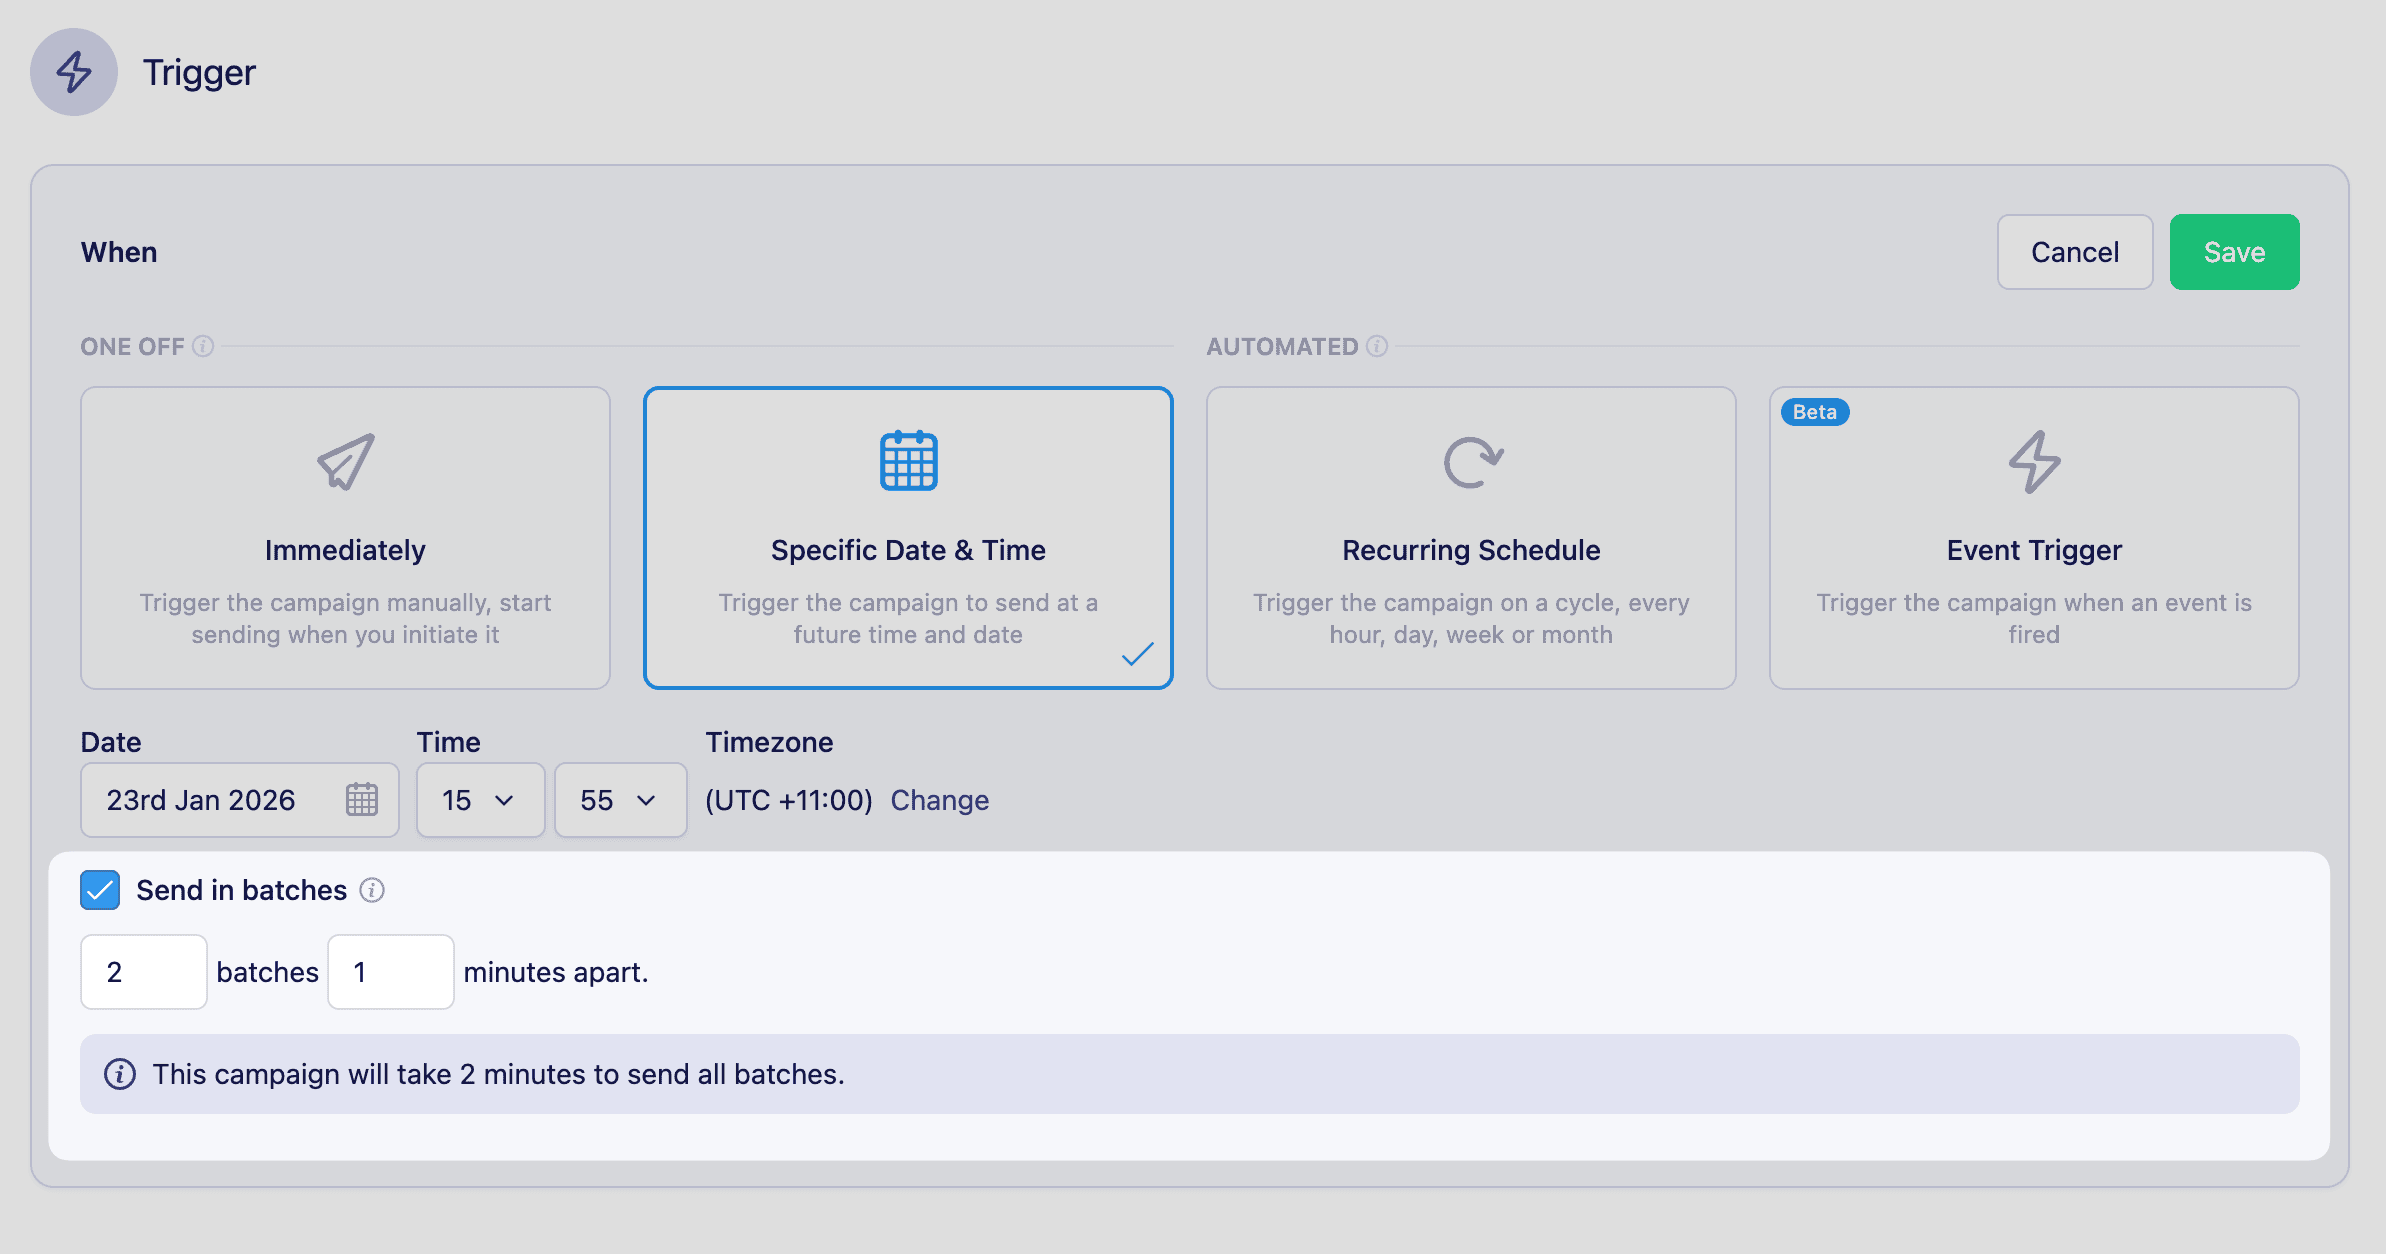 Batch sending allows you to spread your broadcast across multiple sends over time. This is useful for:
* **Building sender reputation** — Gradually increase sending volume to establish trust with email providers
* **Managing deliverability** — Avoid overwhelming mailbox providers with large volumes at once
* **Warming up new domains or IPs** — Send in smaller increments while building your sending reputation
### How to enable batch sending
1. In your broadcast's trigger settings, select **Scheduled** as your trigger type
2. Check the **Send in batches** option
3. Choose the **number of batches** to split your audience across
4. Set the **minutes apart** (the delay between each batch send)
5. Click **Save**
For example, if you have an audience of 10,000 and configure 5 batches with 1 hour between each:
* Batch 1: 2,000 recipients sent immediately at the scheduled time
* Batch 2: 2,000 recipients sent 1 hour later
* Batch 3: 2,000 recipients sent 2 hours later
* Batch 4: 2,000 recipients sent 3 hours later
* Batch 5: 2,000 recipients sent 4 hours later
If you're new to email sending or have recently changed your email infrastructure, start with more batches and longer delays between them. As your sender reputation improves, you can reduce the number of batches.
## Review and launch
Before launching your broadcast:
1. Click **Review and Schedule** or **Review and Send**at the top of the campaign page
2. Review your campaign schedule, audience size, and message type
3. Click **Send**
For scheduled campaigns, your campaign status will show as **Scheduled** until the send time arrives.
Batch sending allows you to spread your broadcast across multiple sends over time. This is useful for:
* **Building sender reputation** — Gradually increase sending volume to establish trust with email providers
* **Managing deliverability** — Avoid overwhelming mailbox providers with large volumes at once
* **Warming up new domains or IPs** — Send in smaller increments while building your sending reputation
### How to enable batch sending
1. In your broadcast's trigger settings, select **Scheduled** as your trigger type
2. Check the **Send in batches** option
3. Choose the **number of batches** to split your audience across
4. Set the **minutes apart** (the delay between each batch send)
5. Click **Save**
For example, if you have an audience of 10,000 and configure 5 batches with 1 hour between each:
* Batch 1: 2,000 recipients sent immediately at the scheduled time
* Batch 2: 2,000 recipients sent 1 hour later
* Batch 3: 2,000 recipients sent 2 hours later
* Batch 4: 2,000 recipients sent 3 hours later
* Batch 5: 2,000 recipients sent 4 hours later
If you're new to email sending or have recently changed your email infrastructure, start with more batches and longer delays between them. As your sender reputation improves, you can reduce the number of batches.
## Review and launch
Before launching your broadcast:
1. Click **Review and Schedule** or **Review and Send**at the top of the campaign page
2. Review your campaign schedule, audience size, and message type
3. Click **Send**
For scheduled campaigns, your campaign status will show as **Scheduled** until the send time arrives.