> ## Documentation Index
> Fetch the complete documentation index at: https://help.getvero.com/llms.txt
> Use this file to discover all available pages before exploring further.
# Scoping event conditions by property
> Scope Journey conditions to a specific event property value so users can qualify independently for each item they interact with.
Condition scoping lets you evaluate a Journey's true/false node conditions against a specific event property value — so Vero matches events that share that value with the trigger event, rather than checking the user's full event history globally.
This is particularly useful for abandonment-style Journeys, where a user might interact with multiple items and you want to follow up independently for each one they don't act on.
## When to use condition scoping
Use condition scoping when:
* Your trigger event fires once per item (e.g. `viewed_product`, `added_to_cart`, `viewed_listing`)
* You want a true/false node condition to check whether the user acted on **that specific item**, not on any item
* Users should be eligible to receive follow-up messages for each item independently
**Example:** A user views products A, B, and C. They then purchase product A. Without scoping, a condition checking "has not triggered `purchased_product`" sees a purchase exists and suppresses the follow-up for all three products. With scoping on `sku`, Vero checks each product independently — so the user still receives follow-up messages for products B and C, but not A.
## Setting up condition scoping
Condition scoping is configured inside each **true/false node's** conditions — not at the Journey level. Each true/false node can have its own scoping configuration.
1. Open your Journey and add or select a **true/false node**.
2. In the true/false node's conditions panel, add your conditions — for example, "user has not triggered `purchased_product`."
3. In the **Advanced options** section at the bottom of the conditions panel, check the "Scope conditions by trigger event property" option:
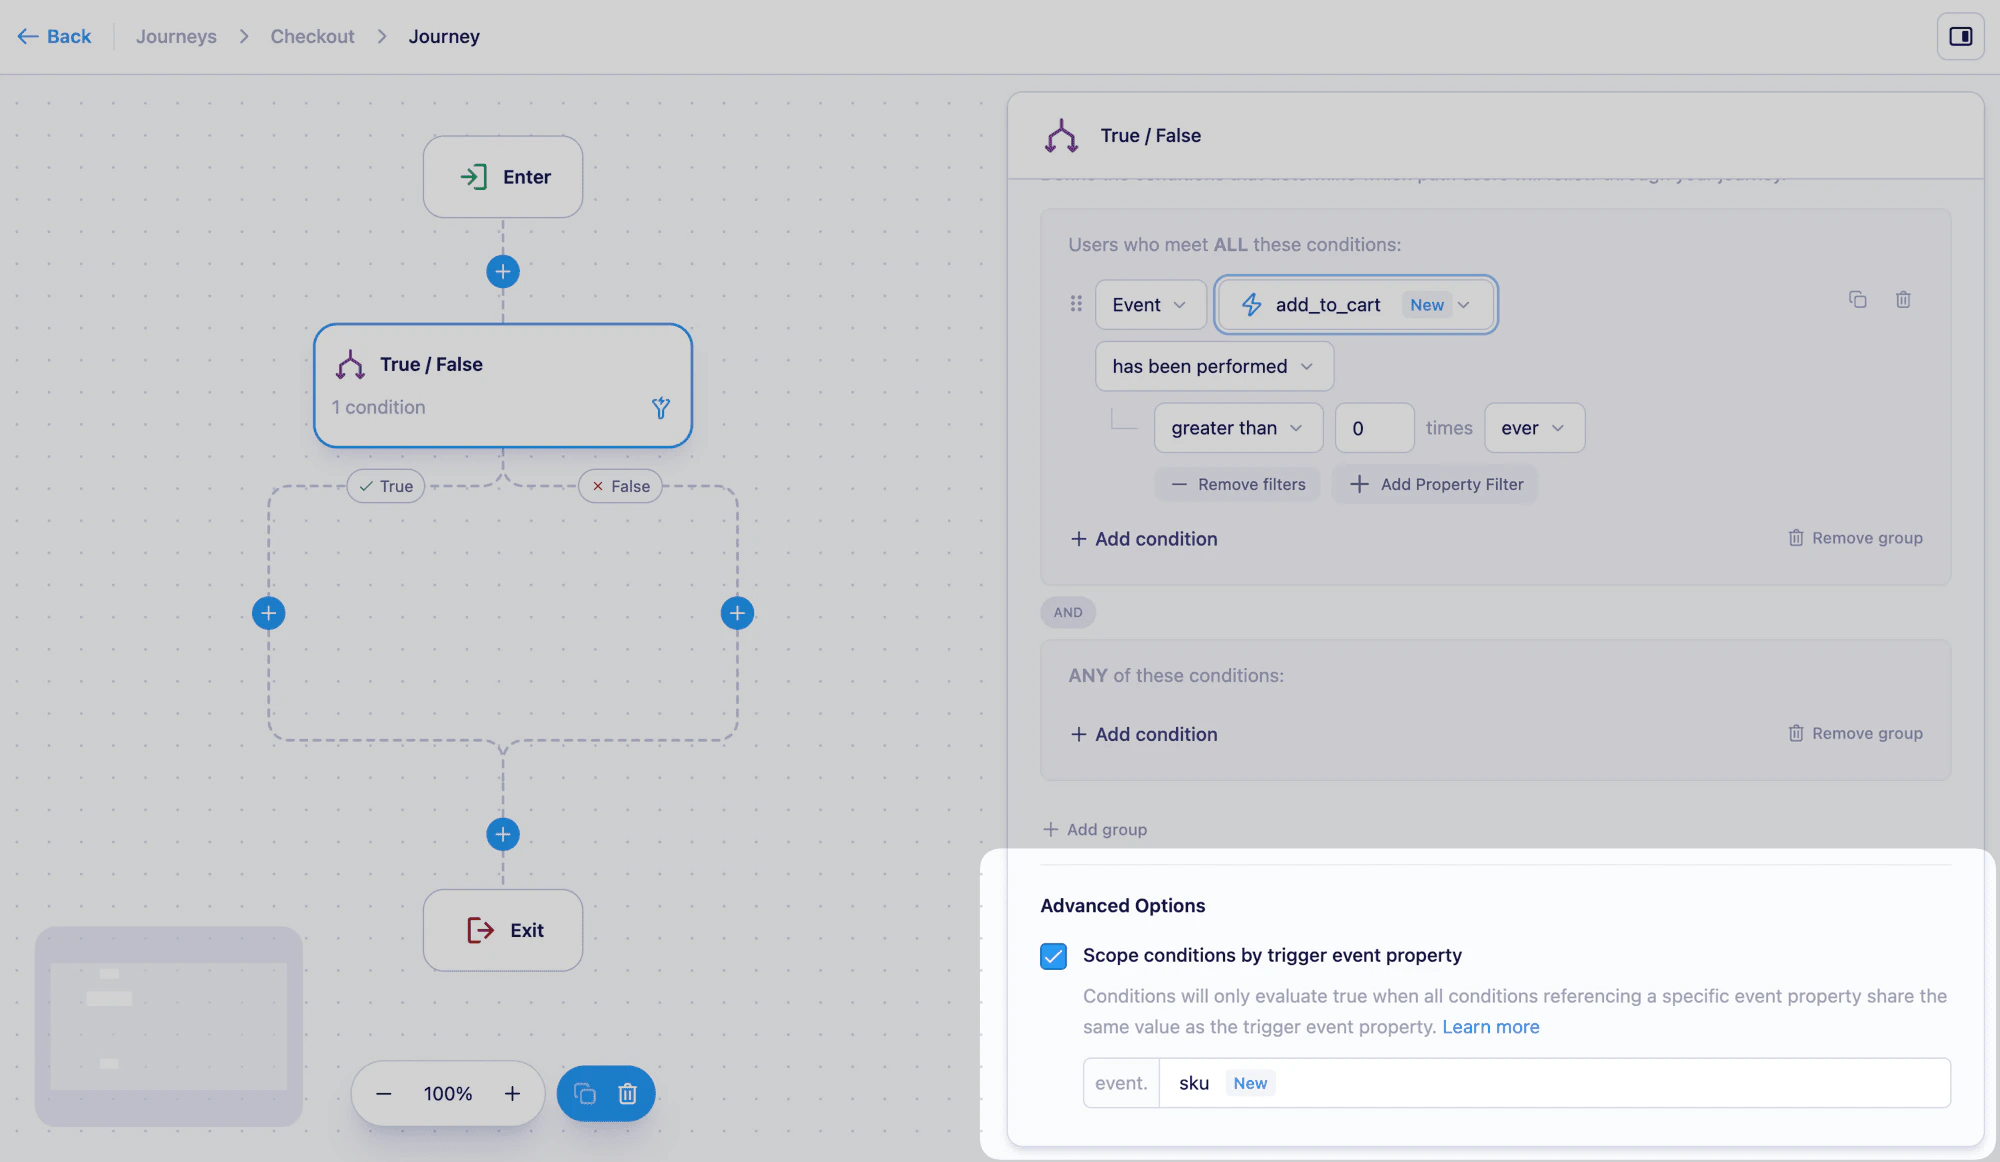 4. In the **Scope conditions by** dropdown, select the event property you want to use as the matching key (e.g. `sku`). You can search for a property or enter a custom value.
5. Save the node and continue building your Journey.
You can configure scoping independently on each true/false node. This means some nodes can evaluate conditions globally while others scope to a specific property — configure it only where it's relevant.
## How Vero evaluates scoped conditions
When scoping is enabled on a true/false node, Vero requires that any events referenced in that node's conditions share the **same value** for the scoped property as the trigger event that started the user's journey.
Using the `sku` example:
* Trigger: `viewed_product` with `sku: "1234"`
* Scoped property: `sku`
* Condition: user has not triggered `purchased_product`
Vero checks specifically for a `purchased_product` event where `sku` equals `"1234"`. A `purchased_product` event with a different `sku` does not satisfy the condition — so the Journey continues for the unmatched product.
The scoped property must exist on both the trigger event and any events referenced in the node's conditions. If the property is absent from one of the events, Vero won't be able to match them correctly.
## Personalizing messages with scoped event data
Because each journey instance is scoped to a specific property value, you can use the trigger event's properties in your message content to personalize for the specific item.
For example, if your `viewed_product` event includes `name` and `price`:
```
Hi {{ user.first_name | default: "there" }},
You left {{ event.name }} behind — it's still available for {{ event.price | money }}.
```
Each user's journey instance will render with the correct product details for the item they viewed.
[Learn more about personalizing messages with Liquid](https://help.getvero.com/vero-2/message-content/how-to-personalise-your-message-using-liquid)
## Limitations
* Condition scoping is available on true/false nodes only.
* The scoped property must be present on all events referenced in that node's conditions.
* Each true/false node is scoped independently — there is no journey-wide scoping setting.
In Vero 1.0, this feature was called "scope by" and was configured at the campaign level, applying to all conditions across a Workflow. In Vero 2.0, scoping is set per true/false node, giving you more control over which conditions are scoped and which evaluate globally.
## Next steps
* [Creating and editing a Journey](https://help.getvero.com/vero-2/campaigns/journeys/creating-and-editing-journeys) — Build your first Journey
* [Event triggers](https://help.getvero.com/vero-2/campaigns/journeys/event-trigger) — Learn how event-triggered Journeys work
* [Personalize content with Liquid](https://help.getvero.com/vero-2/message-content/how-to-personalise-your-message-using-liquid) — Use event data in your message content
## Need Help?
If you have any questions, reach out to us at [support@getvero.com](mailto:support@getvero.com).
4. In the **Scope conditions by** dropdown, select the event property you want to use as the matching key (e.g. `sku`). You can search for a property or enter a custom value.
5. Save the node and continue building your Journey.
You can configure scoping independently on each true/false node. This means some nodes can evaluate conditions globally while others scope to a specific property — configure it only where it's relevant.
## How Vero evaluates scoped conditions
When scoping is enabled on a true/false node, Vero requires that any events referenced in that node's conditions share the **same value** for the scoped property as the trigger event that started the user's journey.
Using the `sku` example:
* Trigger: `viewed_product` with `sku: "1234"`
* Scoped property: `sku`
* Condition: user has not triggered `purchased_product`
Vero checks specifically for a `purchased_product` event where `sku` equals `"1234"`. A `purchased_product` event with a different `sku` does not satisfy the condition — so the Journey continues for the unmatched product.
The scoped property must exist on both the trigger event and any events referenced in the node's conditions. If the property is absent from one of the events, Vero won't be able to match them correctly.
## Personalizing messages with scoped event data
Because each journey instance is scoped to a specific property value, you can use the trigger event's properties in your message content to personalize for the specific item.
For example, if your `viewed_product` event includes `name` and `price`:
```
Hi {{ user.first_name | default: "there" }},
You left {{ event.name }} behind — it's still available for {{ event.price | money }}.
```
Each user's journey instance will render with the correct product details for the item they viewed.
[Learn more about personalizing messages with Liquid](https://help.getvero.com/vero-2/message-content/how-to-personalise-your-message-using-liquid)
## Limitations
* Condition scoping is available on true/false nodes only.
* The scoped property must be present on all events referenced in that node's conditions.
* Each true/false node is scoped independently — there is no journey-wide scoping setting.
In Vero 1.0, this feature was called "scope by" and was configured at the campaign level, applying to all conditions across a Workflow. In Vero 2.0, scoping is set per true/false node, giving you more control over which conditions are scoped and which evaluate globally.
## Next steps
* [Creating and editing a Journey](https://help.getvero.com/vero-2/campaigns/journeys/creating-and-editing-journeys) — Build your first Journey
* [Event triggers](https://help.getvero.com/vero-2/campaigns/journeys/event-trigger) — Learn how event-triggered Journeys work
* [Personalize content with Liquid](https://help.getvero.com/vero-2/message-content/how-to-personalise-your-message-using-liquid) — Use event data in your message content
## Need Help?
If you have any questions, reach out to us at [support@getvero.com](mailto:support@getvero.com).