Mobile push notification in integration guide
Table of contents
- Configure push in your application
- Configure push notifications in your application
- Identify device tokens with Vero
- Tracking push "opens" with Vero
- Testing push notifications
Definitions
Throughout this help article, here's what we mean when we use the following terms:
- Push notification. A notification sent to an iOS or Android device using Apple or Google's inbuilt notification infrastructure. This is different to a "web push" message or an SMS.
- Push delivery provider. The service that manages your certificates with Apple and Google and sends push messages via those platforms. Vero sits "on top of" your push delivery provider.
1. Configure push in your account
a. Supported push delivery providers
Vero sends push messages to your customers by integrating with common and popular push delivery providers. At this time we support the following providers:
These providers enable you to manage your APN, GCM and FCM certificates in a central place. By using Vero "on top of" your current configuration with these providers, you can use Vero alongside direct push messages you send from your application backend with less hassle and less duplication. .
In the future we may provide support for direct APN, GCM and FCM certificate integration, rather than sitting on top of Amazon SNS, Twilio Notify and others: if this is of interest to you, we're keen on your feedback. Please email us at support@getvero.com.
b. Enabling push in Vero
Navigate to Settings > Push Delivery. Using this menu, you can add one or multiple push provider configurations. To add an integration, select the provider you wish to use and enter the appropriate details. Follow the instructions below for the various providers supports.
Amazon SNS
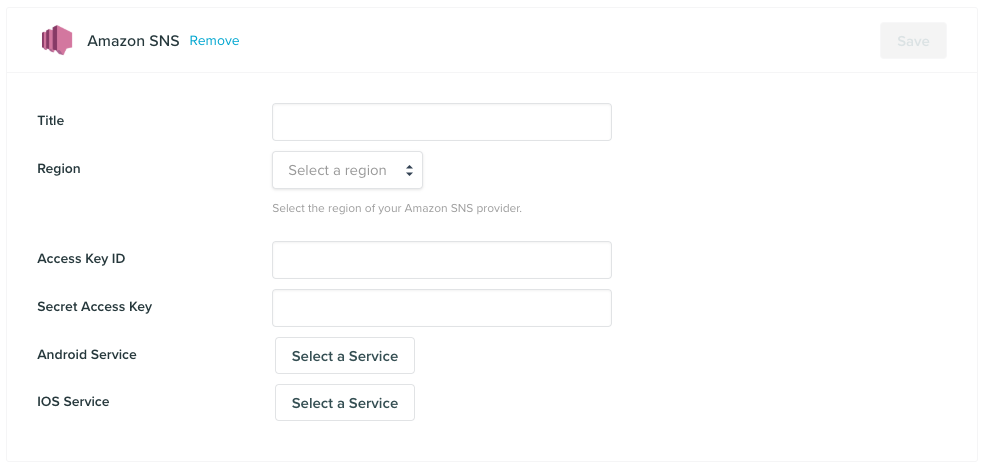
To integrate Vero with Amazon AWS, firstly give your new push delivery provider a name – this is a Vero-internal name for easy identification, it won't be seen by customers. Select the AWS region (e.g. us-east-1) in which your AWS SNS account is configured and add an Access Key ID and Secret Access Key. We recommend creating a new IAM user for your Vero account, specifying specific access to AWS SNS.
We've written a help article outlining the correct AWS IAM policy configuration to ensure you can use AWS SNS with Vero.
Once you've added these details to Vero, use the Select a service dropdown to link your Vero configuration to the appropriate iOS service and/or Android service in SNS.
Hit Save to store your credentials.
Twilio Notify
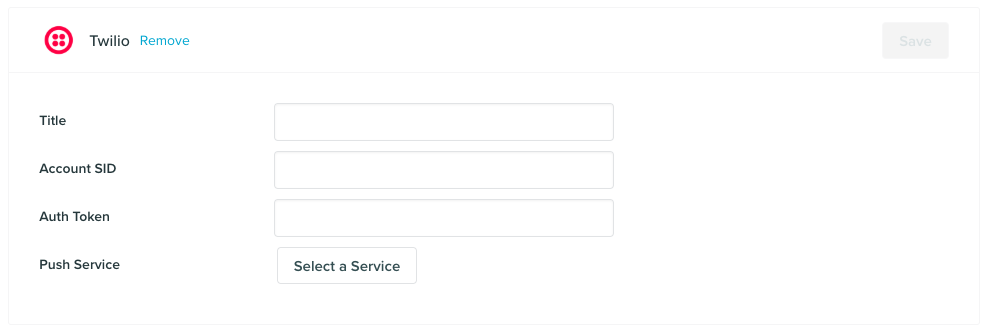
To integrate Vero with Twilio Notify, give your integration a name (this is a Vero-internal name for easy identification, it won't be seen by customers). Add the Twilio Account SID found here and your Auth Token for the Twilio account you want to use. Once added, use Select service to select the Twilio Notify Service (as listed in Twilio here) that you want to use with Vero.
Hit Save to store your credentials.
2. Configure push notifications in your application and obtain a unique device
As you will be using Vero on top of either Amazon SNS or Twilio, we expect that you will already have the following setup configured to support push notifications:
- Configured your Delivery Provider's integration with Apple and/or Google's Android
- An application server backing your iOS/Android application
- Configured your iOS/Android application to register a customer's device, receiving a device token uniquely identifying a certain device
Each Delivery Provider has it's own documentation on how to configure the above. For example, for Twilio, we recommend referring to these guides:
- iOS Quickstart
- Android Quickstart
- Registering for push notifications on iOS
- Registering for push notifications on Android
Before you proceed, ensure you have successfully setup your Delivery Provider to register devices and receive basic push messages.
3. Identify device tokens with Vero
In order to use Vero on top of your Delivery Provider, you must add unique device tokens your user profiles in Vero.
Based on the architecture described in step two above, generally your iOS or Android Client will pass the device token to your application backend. You will then register the unique device token with your Delivery Provider (AWS, Twilio, etc.) from your backend.
At this point, you must update your code to also add the device token to the correct user's profile in Vero. This should be done via your server backend so as to avoid exposing your Vero credentials in the application on the device itself.
Every time the device token changes and you register it with your Deliver Provider, you should also add the token to the correct user's profile in Vero.
To add a device token to a customer profile in Vero, make a request to Vero's API using the identify method that includes the channels hash, as in the example below.
Note that the type column should always be push for iOS and Android device tokens, and the platform column should be either ios or android, as relevant. Our API documentation covers our identify endpoint in more detail.
curl \
  --header "Content-Type: application/json" \
  --request POST \
  --data '{
    "auth_token":"YOUR_AUTH_TOKEN",
    "id":"test@getvero.com",
    "channels": [{"type": "push", "address": "UNIQUE_DEVICE_TOKEN", "platform": "ios"}],
    "data": {"first_name": "John", "last_name": "Doe"}
  }' \
  https://api.getvero.com/api/v2/users/track
The platform field only accepts two values: ios and android.
Don't forget that Vero's API expects a Content-Type header of type application/json. You can see more examples of requests using our different libraries via our API Reference.
4. Tracking push "opens" with Vero
When a push notification is sent to a user's device, your application must handle the incoming push notification. As part of the configuration of your Delivery Provider as outlined in Section 2 above, you will have implemented code to handle incoming notifications.
If a user elects to open or interact with your notification, you can track this engagement using Vero's API as part of handling this interaction. To do this, as part of your application's device callback, you need to extract the message_data property provided by Vero and make a request to our API.
We've included examples of how to do this on both iOS and Android below. Note that these are just simple examples and should be used as a guide alongside your own application code.
iOS example
Here is an example of how we would recommend handling push notifications and tracking engagement into Vero on iOS:
// Called when push message is received
func application(_ application: UIApplication, didReceiveRemoteNotification userInfo: [AnyHashable : Any], fetchCompletionHandler completionHandler: @escaping (UIBackgroundFetchResult) -> Void) {
  // Vero push notifications includes a "message_data" field which
  // can be used to send feedback on interaction.
  // See example below:

  if let messageDataValue = userInfo["message_data"] {
    let messageData = String(describing: messageDataValue)

    let parameters: Parameters = [
      "auth_token": "YOUR VERO AUTH TOKEN",
      "message_data": messageData
    ]

    Alamofire.request(
      "https://api.getvero.com/api/v2/notifications/acknowledge", method: .post, parameters: parameters
    )
  }
}
Android example
Here is an example of how we would recommend handling push notifications and tracking engagement into Vero on Android:
/**
    * CCalled when push message is received
    *
    * @param message The remote message, containing from, and message data as key/value pairs.
    */
    @Override
    public void onMessageReceived(RemoteMessage message) {
      Map<String,String> data = message.getData();
      String messageData = data.get("message_data");

      if (messageData != null) {
        try {
          URL url = new URL("https://api.getvero.com/api/v2/notifications/acknowledge");
          HttpURLConnection connection = (HttpURLConnection) url.openConnection();
          connection.setRequestMethod("POST");
          connection.setRequestProperty("Content-Type", "application/json;charset=UTF-8");
          connection.setRequestProperty("Accept","application/json");
          connection.setDoOutput(true);
          connection.setDoInput(true);

          JSONObject jsonParam = new JSONObject();
          jsonParam.put("auth_token", VERO_AUTH_TOKEN);
          jsonParam.put("message_data", messageData);

          DataOutputStream outputStream = new DataOutputStream(connection.getOutputStream());
          outputStream.writeBytes(jsonParam.toString());

          outputStream.flush();
          outputStream.close();

          connection.disconnect();
        } catch (Exception e) {
          e.printStackTrace();
        }
      }
    }
5. Testing push notifications
To test a single push notification, first create a new push message campaign. You can then select the Test push option above the content preview.
Using the preview push modal, search for and select any user record in your Vero account that has a device_token set on their profile. Note that we will search for device_tokens that match the platform(s) selected for a given campaign. For example, if you create a new push campaign and select iOS as the platform to target, we will search for users that have an iOS device_token set.
Once you've selected your test profile, hit Send and we will then deliver a test version of the push message to the device selected.
In order to test a single push notification you need to ensure that you have added test users to your Vero project. This can be done using the API, as described above.
Coming soon. We are be releasing the ability import device tokens via CSV in the very near future.
6. Going live
You've now completed an end-to-end test of a push notification to a user profile in Vero. Once you're comfortable your successfully adding device tokens to all of your user profiles in Vero, you can begin sending campaigns to customers at full speed!