What is a recurring schedule trigger?
In Vero, there are multiple ways to decide when a campaign should start sending. The recurring schedule is an automated trigger that you can use to initiate a campaign to send messages to a dynamically defined set of users on a cycle, for instance every hour, day, week or month. Recurring schedules work in tandem with SQL queries and segment audiences, giving you the ability to send bulk messages to precise and current recipient lists. These lists are generated every time the schedule runs, ensuring accuracy and timeliness.Why use a recurring schedule?
Recurring triggers can be used to automate a number of messaging use cases: Scenario 1: Imagine you want to send weekly customer satisfaction surveys to a targeted group of users who have recently interacted with your support team. With a recurring schedule trigger you can define a SQL query to identify these users based on their support ticket history or specific criteria. Set the frequency to ‘weekly’ and send a message pointing them to your survey. Once enabled, the system will automatically send the survey to the identified users every week, ensuring consistent feedback collection without manual effort. Scenario 2: Imagine you want to send a message to every user who signed up in the last 24 hours. Simply set your campaign to send on a recurring schedule every day at 12pm and then write a SQL query that finds users who signed up within the last 24 hours. With direct access to your data warehouse and the ability to run a query on a recurring schedule, you can simplify your onboarding campaigns and trust that the data powering them is always on point.How does it work?
When a campaign with a recurring schedule trigger is running, the SQL query is re-run on the schedule you define (eg. once a day at 11am or every week on Tuesday at 9am). Every time the schedule runs, the query outputs a new list of users and a message is sent to every user in that list. To create a recurring campaign, follow these steps:-
In your campaign, choose the ‘Recurring schedule’ trigger from the ‘triggers’ section and set your chosen schedule (e.g every day at 12:30pm)

- Choose a SQL based audience with a data source such as Postgres or MySQL and write some SQL to define the audience you want to send the message to each time the schedule runs.
-
Add some email content. Personalise your content with data from the columns defined in the audience from step 2. Use Liquid to add user data like
{{user.first_name}}into your template. -
Review and start your campaign.
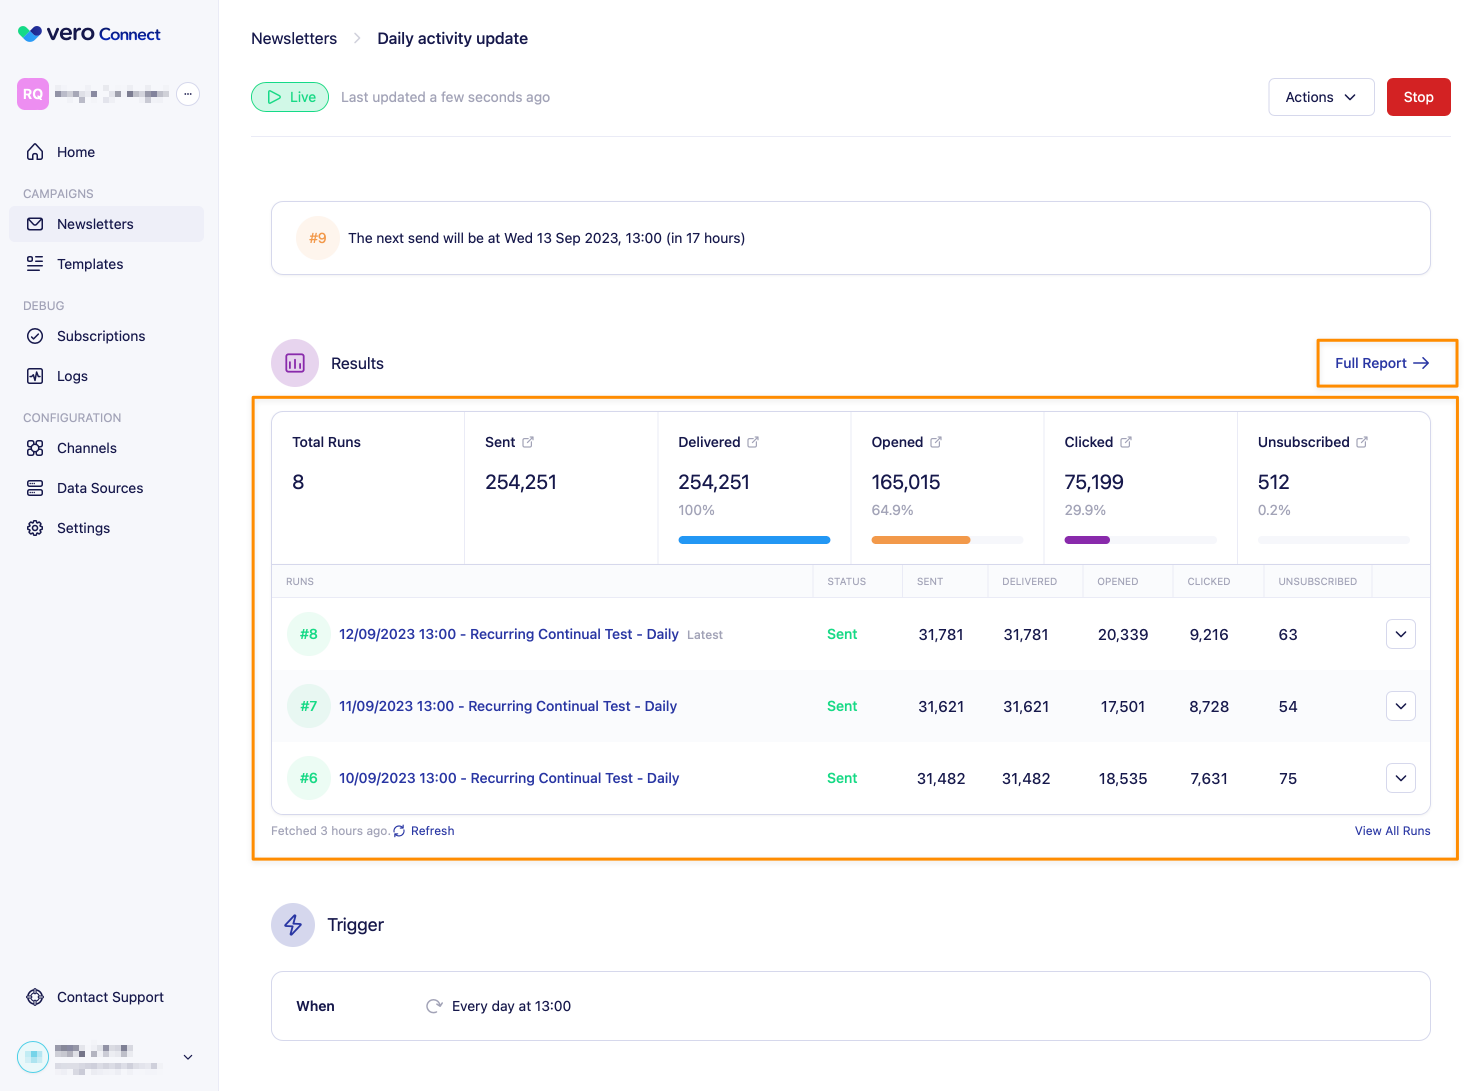
- Watch as your campaign runs automatically every day at the selected interval. Review each send in the ‘Runs’ section, and get a more detailed view of your campaign in the full report.
Which data sources are supported?
Recurring schedule triggers currently support any SQL based data source:- ✅ Postgres
- ✅ MySQL
- ✅ MicrosoftSQL Server
- ✅ Redshift
- ✅ Snowflake
- ❌ CSV’s
- ❌ Google Sheets
Can I use a custom schedule?
If the schedule you wish to run your campaign on is not supported using the hour, day, week or year options, you can add a custom schedule using the Custom (Crontab) option. Crontab formatting is an advanced feature, it consists of 5 properties like this:*: any value*/n: every n values, e.g./15(Note: specifying the minimum time is not supported, e.g.1/5is not supported, however,1-15/5is supported)-: range of values, e.g.1-5. Can be used together with,,: list of values, e.g.1,3,4. Can be used together with*
What happens in months with less days than the scheduled day of the month?
On months with less than the number of days set in the schedule, the last day of the month will be used. For example, a schedule set for the 31st will be triggered on the 30th if there is no 31st day.How do I report on a recurring schedule triggered campaign?
Every time the recurring schedule trigger initiates a send to a new set of recipients, a ‘run’ is created and the top three runs are shown at the top of the page. There is also a ‘ Full Report ’ which shows a full overview of all runs and the aggregated stats for each messages sent in the campaign, it is also possible to view a report for each individual run by clicking on the timestamp.